Marketing Problem Solver

Category: Chickens

Build a Chicken Coop for Less than $250

The chicks that my cousin hatched out for us 3 weeks ago are getting much larger now. They really needed to get out of the brooder and into their own full size chicken coop. I really liked the first chicken coop that we have and wanted to build the second one the same way. It’s a solid design that has kept out predators for us plus it was cheap to make and quick too. It took 3 people about 12 hours to build the run for this coop, with multiple trips to the hardware store. The total cost for the house/coop and the run was $247.47.

Chicken Coop Full View

What you’ll need to buy:

Material Quantity Unit Price Total
Pre-Built Dog House 1 $109.99 $109.99
2″x2″x36″ Baluster (used for porch railing) 23 $0.89 $20.47
Hardware cloth (3′x10′; 36″ wide with 1/4 inch holes) 4 $17.97 $71.88
Door Hinges (3″) 2 $2.49 $4.98
Safety Latch (make sure it isn’t more than 3″ wide) 1 $2.98 $2.98
Door Handle (4″) 1 $2.60 $2.60
Rubber Coated Cup Hooks 1 $0.99 $0.99
9×3 Outdoor Wood Screws 1 $7.99 $7.99
Staples (T50 3/8″) 1 $3.46 $3.46
Sand paper (60/100/120 grit) 1 $2.29 $2.29
Play Sand 8 $2.48 $19.84
Grand Total $247.47

Tools you’ll need:

Drill

1/8″ Drill Bits

Phillips Screwdriver Bit

Hammer

Mallet

Wood Hand Saw

Metal Hand Saw

Staple Gun

Pliers

Straight Cut Aviation Metal/Tin Snips/Shears

Clamps

2″x4″ Wood

Tape Measure

Pencil

Chicken Coop Supplies:

Extension Cord

Heat Lamp

Feeder

Waterer

Landscape Brick

Chicken Coop Instructions

  1. Put together the pre-built dog house/chicken coop per the manufacturer’s instructions except you shouldn’t screw on the roof. We’ve left it unscrewed for easy access into the coop.
  2. Cut off both of the angled ends of 15 Balusters using the clamps to hold the wood in place on your work surface (I used a stool) and the wood hand saw. Get as close to the edge as possible so the are square, but it doesn’t need to be perfect. Use the sandpaper to finish the ends so you don’t get any splinters later on.
  3. Cut off one angled end of 8 Balusters. These will be used for the chicken coop sides. Use the sandpaper to finish the ends so you don’t get any splinters later on.
  4. Screw together your top and bottom. I used the 1/8″ drill bit to pre-drill the holes. The outdoor wood screws have a feature on the end that makes them easier to install, but I still find it easier to pre-drill the holes. If any screws pop through when doing the middle pieces, use the metal hand saw to cut off the screws.
    Side of Chicken Run Top Corner of Chicken Run
  5. Roll out the hardware cloth over the top piece. We used landscape bricks to hold down the hardware cloth before cutting it. Cut to size with tin snips. You should only have to cut one end as it is already the the same size as the 36″ Balusters. Try to cut as close to the joints as possible to avoid snagging your clothing later on. Secure the hardware cloth to the wood with staples every 3″. If you miss or the staple doesn’t go in all the way, use the pliers to pull it out or the hammer to push it in.
  6. Repeat step 4 for the bottom piece.
  7. Now you’re ready to secure the top to the bottom. Screw in the side pieces to the bottom. There is a Baluster at each corner, and two in the middle to stabilize the chicken coop.
  8. Screw in the side pieces from the top so it is screwed on bottom and top.
  9. Add your hardware cloth to both sides.
    Side Corner of Chicken Run
  10. For the ends, you’ll start with the part of the run that the chicken coop goes into. We used 2″x4″ pieces of wood around the front of the door to make sure the chickens had a secure entrance. The only hardware cloth we used on the opening was just at the top. There is a 5″ gap between the coop roof and the run. Screw in a 36″ baluster with both ends cut off, trim the hardware cloth and staple it. Use the mallet to get the Baluster into place if it is a snug fit.
    Chicken Coop and Run Connection
  11. For the door, screw together your door and add on your hardware cloth. Use a pencil to mark where the holes for your hinges will go and screw the door to the coop. On our new coop, I put the hinge flat onto the door and supporting side piece. For the first coop, I put it on a right angle. Screw on your handle and latch. We use a combination lock to lock the door of the coop since we live in the city.
    Chicken Coop Door
  12. Next to the door, you’ll want to add in your last Baluster piece so you can close the coop with hardware cloth.
  13. Screw in a cup hook on either side of the coop, just below the roof. You’ll use these to hang a heat lamp on one side and your feeder on the other.
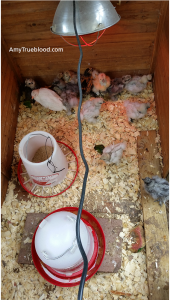
    Inside the Chicken Coop
  14. Add in bedding. We use sand in the run and corn cob or pine shaving bedding for the coop.
  15. Add in your waterer, use a landscape brick to keep the chickens from getting a lot of bedding in it.
  16. Add in your chicks/chickens and get the camera out!

Chicks in Chicken Coop

Chicken Coop Blueprint

Optional Accessories:

Porch Swing Bird Feeder-I just fell in love with this feeder and since it is the end of the season, I happened to get one on closeout at Lowe’s. I’ve also seen this at Tractor Supply Company too.

Flowers/Herbs-I got a few pots of pollinator-friendly flowers to put around our honeybee hives and the coops. There are herbs that people plant near their chicken coops to reduce odor and bugs. I’d like to plant basil, lavender, mint and rosemary next year.

Exercise Pen with Bird Net-During the summer I wanted to let the chickens have a little extra room without sacrificing safety. A fellow BYC Indiana thread commenter, recommended this great exercise pen. I found it at Tractor Supply and just added chicken wire on the outside with zip ties to secure it. I put bird netting above it to keep out any flying predators. The chickens are closed up at night and only allowed outside in the extra space during the day.

Optional Exercise Pen

Chicken Roost-I bought a thick dowel rod and used closet hardware to add a roost on the inside of our first coop. The closet hardware lets you take the rod out to clean it easily. You can see a chicken on the roost in the photo above.

PVC Waterer-My cousin actually custom built a waterer out of PVC and nipples for our first coop. It holds 2 gallons of water and works really well.

Rocks/Driftwood-I added in some different sized rocks and a piece of driftwood to our first coop so the chickens could perch and give them something to do. When the coop is cleaned out, I re-arrange them to make it more interesting for them.

Photographing Chickens – 6 Quick Tips for Amazing Photos

Yesterday while on BackyardChickens.com, a member asked the silkie group how everyone took such amazing photos. She said that every time she tries to take photos, they don’t turn out very well. I don’t think that I take amazing photos I don’t know that I take amazing photos, but I’ve learned some things over the past year while trying to photograph my chickens.

6 tips for photographing chickens:

#1 Lighting

I have found pictures taken at dusk turn out the best for me. I think it is because there is no direct light but it is still bright outside. I assume the same would be true if you are an early bird and took pictures at dawn, but wouldn’t know personally. The way may yard is situated, with our side lot to the west of the house, I get filtered light in the evening just before sunset and pictures turn out much better than when I am taking them during the day. I also like photographing chickens around dusk as I don’t have to deal with shadows getting in the way.

#2 Treats

I try to get the birds to look up at me, instead of face down/tail up by bribing them with treats. For our Christmas card in 2013, I posed three chickens and used some club crackers leftover from Thanksgiving to get the birds to sit still and look up. You can see a cracker in front of the white chicken below. I will also try to get the chicken’s attention by holding a treat above their heads or snapping my fingers above their heads. Chickens love to eat bugs and I think the quick movement and sound of fingers snapping makes them think their might be a bug up there for them to eat.

Photographing Chickens for a Xmas Card

#3 Multiple Shots

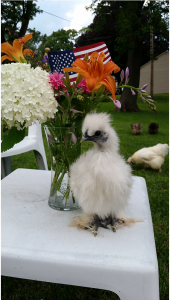
I can take 10 pictures and I might get 1 that is usable. For the Christmas card photo shoot, I took close to 100 photographs and ended up using only 1, but I had several options to choose from. Once I make sure the camera lens is focused on the bird’s face, I will keep taking photographs without looking at them, hoping that one is good. Once the chicken moves, or I feel like I must have gotten a good shot, I will review the pictures to make sure I got at least 1 usable photograph. The pullet in front of the vase of flowers [first, bottom] had her picture taken at least 10 times before I got this one. She was hen raised and isn’t as comfortable in front of the camera as she is just sitting on my lap. The pair of Mille Fleurs [second, bottom] were happy to pose for me at my cousin’s farm, I ended up taking 30 photographs of them to get this shot with a peacock in the background.

Photographing Chick with Multiple Shots Photographing Chickens with Multiple Shots

#4 Videos

Sometimes I’ll end up taking a video and just take a screenshot to get a good picture. It is more difficult to get a clear picture this way, but in some situations it is impossible to take enough pictures to get one good one without making a video.

#5 Find your ham

I have a bird (my BYC avatar actually) that hears me pull out the camera and is there, waiting to pose for me. I have a very small flock (currently 9 silkies) and only 1 ham; chances are good you might have one chicken that would love to pose for you if given the chance and some treats.

I was trying to get pictures of honeybees in our yard one day, and when I pulled out the camera, Toppy, our ham for the camera, blocked the entire shot. I love his expression, as if he is thinking, “why aren’t you taking photographs of me and instead focusing on these little insects?”. I actually take a honeybee photograph for each day and post it across all our social media outlets for CollegeBeekeeper.com. So yes, chickens aren’t the only common subject for my photographs.

Photographing Chickens with a Willing Chicken

What’s even funnier is that I was looking at pics from last year when this guy was still a chick, and here he did the same thing! I was trying to get group shot of the birds in the back of their coop, and he steps right in front of the camera-blocking off the other chickens and in the worst light.

Photographing Chickens with a Willing Chick

#6 Get level

If I am photographing chickens, I am on the ground, usually laying and rolling around the grass as they move around me. If I put them on a surface, I sit up and make sure I am level. I have also found that I tend to get too close to subjects (like the silkie pullet in front of the vase above) and always need to take a step or 2 back. I used an iPhone 4s (5 megapixels) for the photographs from 2013 and use a Samsung Galaxy S5 (16 megapixels) in 2014.

That’s it for my tips on photographing chickens. Hope this helps other backyard chicken keepers take amazing photos of chickens!

Chickens, Ducks and Guineas-oh my!

This spring has been a busy one for us: between working full time and projects around the house, we also decided to hatch out guineas and mille fleurs, purchase ducks and cornish rock chickens in addition to maintaining our flock of silkies. What on earth possessed us to go crazy with poultry you may ask? Two words: chicken math.

Two of our silkie hens did not want to get off the nest and were broody for about 3 weeks before we finally gave in and let them hatch out 5 mille fleurs and 4 guineas. I’ve never had a pet have babies before and it was such a unique experience. I loved checking on the chicks and seeing little heads pop out underneath the mother hen. It was also very interesting to watch the hen teach her young how to eat and drink, how to dust bathe and have fun.

SilkieChickwithHen SilkiewithGuineaKeet

The ducks and cornish rock chickens were not really pets, Tim got them to raise and then butcher. The cornish rocks were ready to butcher within 8 weeks and the meat we got from them is filling up our freezer and our families’ too. I really loved having the ducks, but when we went on vacation for Memorial Day weekend, we didn’t have anyone available to take care of them and ended up having to sell them at an auction.


The cornish rock hens went from being little chicks to full grown birds so quickly. This picture is from April 5 and the video afterwards is from May 21.

CornishRockChicks

Now that we’ve sold the chicks and the ducklings and butchered the cornish rocks, we are back to just having our silkies. It is curiously quiet and my 1-2 hour per day list of chores is down to nearly nothing. Guess that means it is time to enjoy the flock and start planning for what creatures to add next spring.

© 2024 Amy Trueblood

Theme by Anders NorenUp ↑