Amy Trueblood

Marketing Problem Solver

Adventures with Cardboard

When I was a kid, sometimes the best present I could get was the HUGE cardboard box a toy came in, instead of the toy itself. I could draw on it, build a fort with my brother, hide in it and pretend it was a house. As an adult, not much has changed. I recently found a stash of refrigerator boxes at work (they were used for a soap box race in the parking lot to commemorate the 100th running of the Indy 500 race). I asked permission to take a few of these treasures and got some strange looks! Little did the skeptics know how much fun adventures with cardboard can be.

Pile of Cardboard Boxes

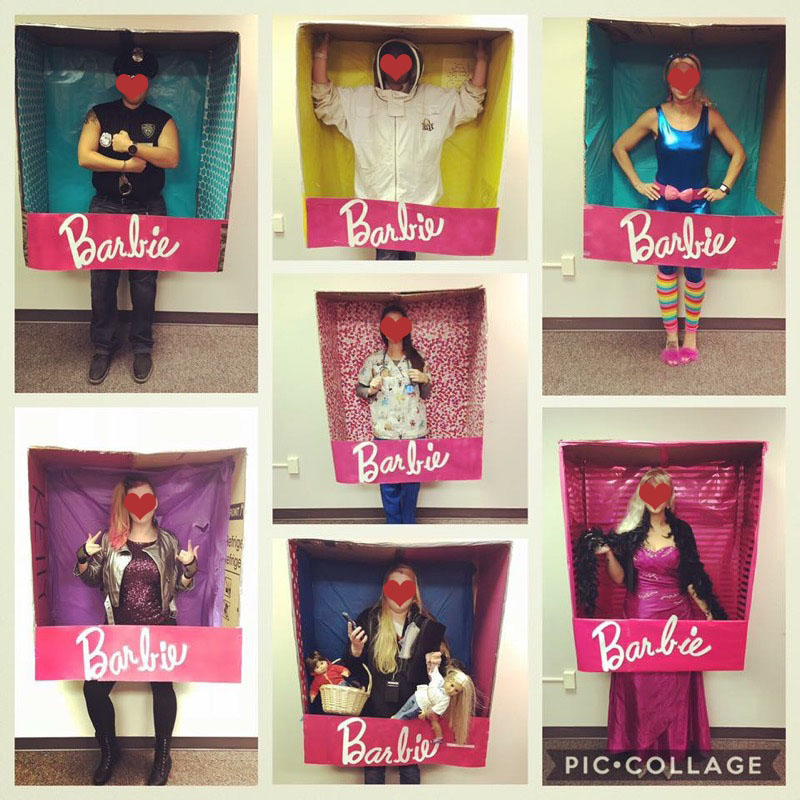
The first project that really kicked off my adventures with cardboard was for Halloween. My cousin wanted to make life size doll boxes, hence why I needed such a huge cardboard box to start with. Cutting thick cardboard isn’t very easy, and using a reciprocating saw ended up being the best way to quickly cut the boxes to the right size. The boxes were cut into 2/3 size in height and then in half so the opening could be the front of the doll box. We had a little painting party to spray paint the boxes pink on the outside, then used wrapping paper on the inside. I made sure the lettering was on the inside of the boxes so it wouldn’t take as many coats to cover the dark black ink. In hindsight, I would say covering all sides in wrapping paper would have been the easiest. I found solid pink wrapping paper at Joann Fabrics for a different project and used it on one of the box insides. I used a Cricut to cut out the letters that everyone had on the front of their boxes.

Barbie Box Halloween Costume Idea - Adventures with Cardboard

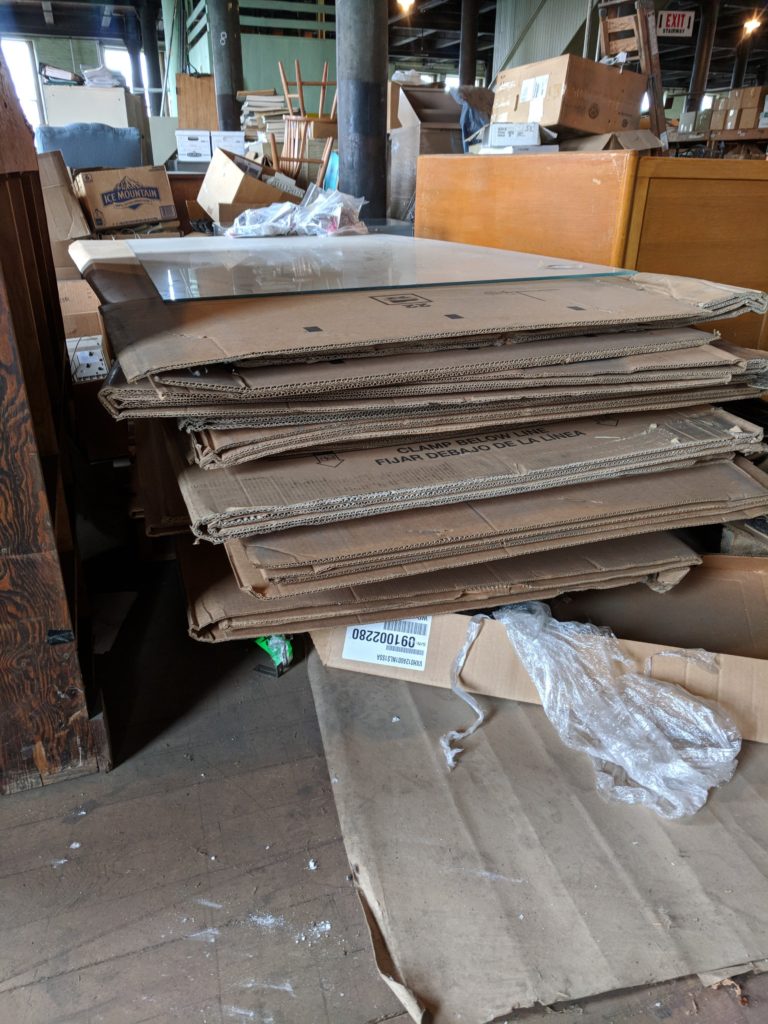
After everyone made their doll boxes, I started eyeing this Gaylord size cardboard box at work used for recycling smaller boxes. They are kept right by the employee entrance behind the restaurant and seeing them every morning got my creative ideas flowing.

Gaylord size cardboard box

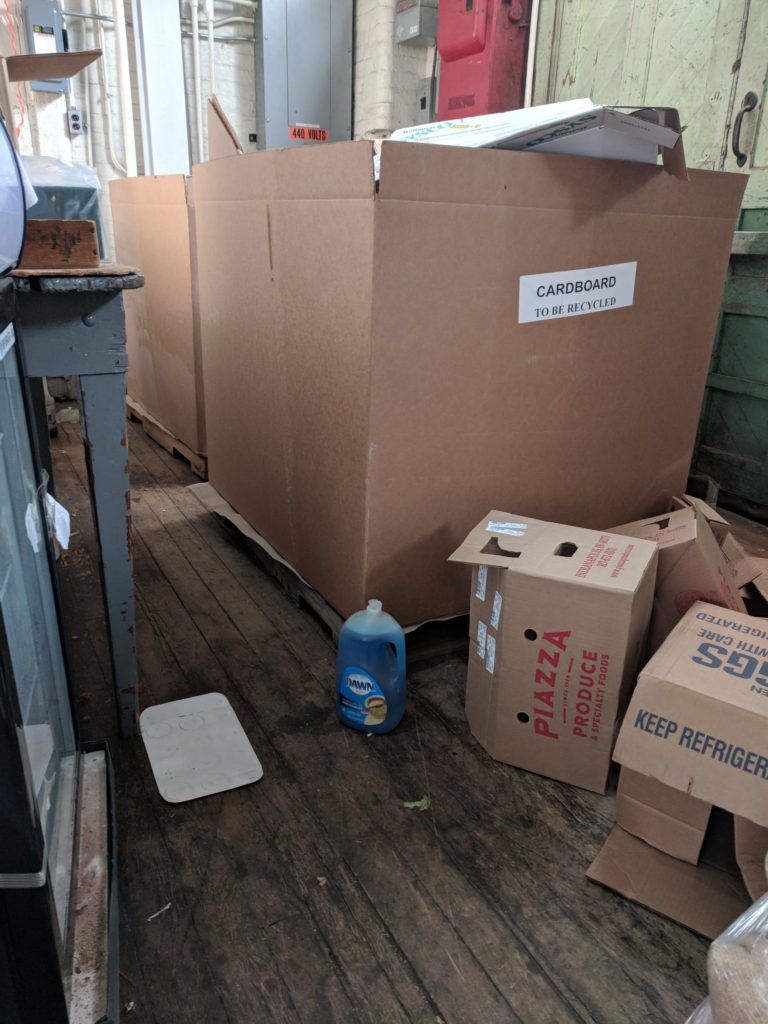
The dish soap in the photo is to show the scale, these boxes fit on a pallet and are just as tall as they are wide.

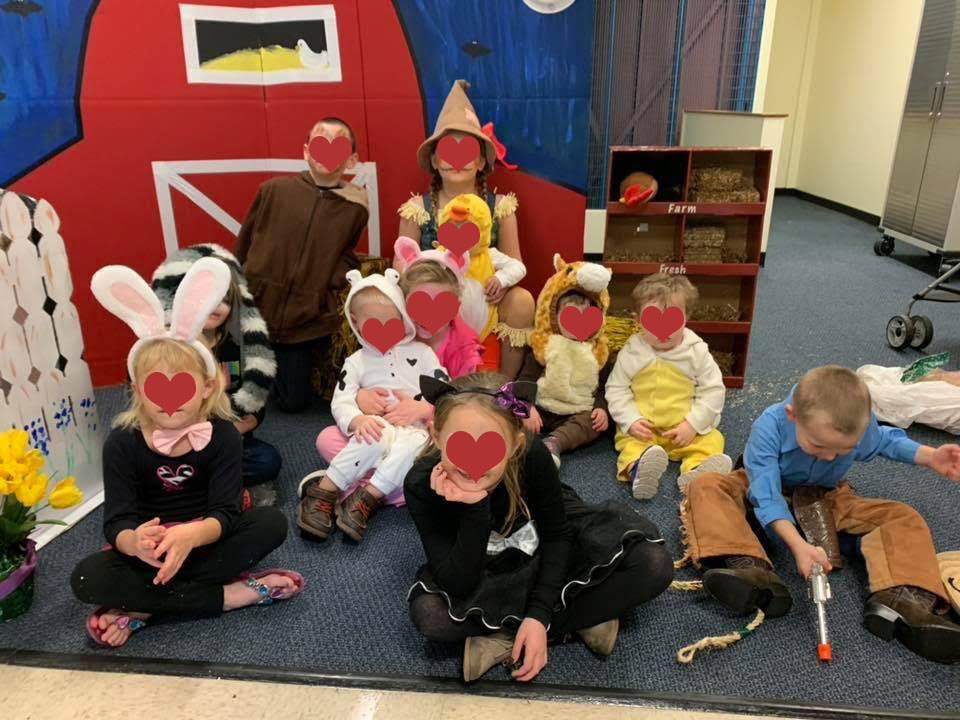
I had signed up to do an indoor Trick or Treat for Halloween and all the kids in my family would be dressing up as barnyard animals. The idea was to transform the space we had into a barnyard complete with a red barn, picket fence area for the young kids and even a nest box for chickens. Everything would be made out of cardboard.

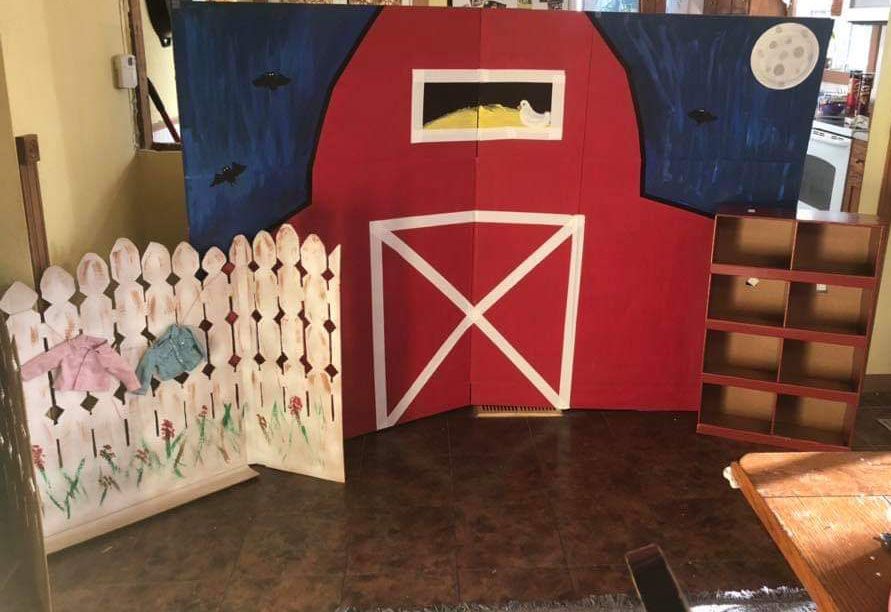
The fence was interesting to put together. While still clearing out clutter from an upper floor of my building, I happened across this tri fold box. The purse in the photo is to show scale. I had part of a decorative fence up at my desk with clothespin line on it to hang thank you cards and photos. My cousin actually traced the fence on the cardboard and cut it out with scissors. I spray painted the cardboard white (this cardboard had no writing on it thankfully) and then my cousin painted the details and hung the doll clothes on it. We made two panels of fence post and used it to help cover up a play pen we could corral the youngest kids in.

When everything was set up and all the kids were in their costumes, it was really a lot of fun. Afterwards, we moved all of the cardboard pieces into a playroom in the basement for the kids to play with. I think their favorite thing to play with is the nest box, they are always putting their toys on the different shelves and playing with the stuffed chicken.

Barnyard with Animals - Halloween Trunk of Treat 2018

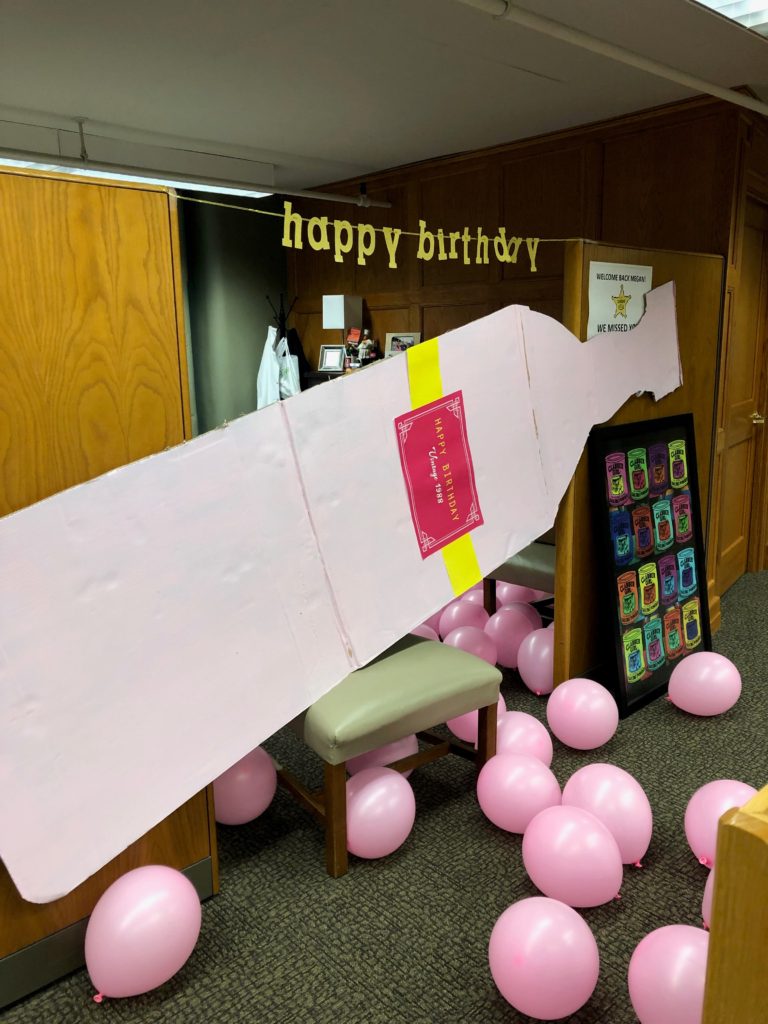
After making the doll boxes and barnyard, I still had a pile of leftover cardboard in the pole barn. One of my co-workers was turning 30 and I helped to plan her party. I liked the theme of a vintage/wine party and ran with it. I used a bottom third of the refrigerator box left over from the doll box and cut out a wine bottle shape using a utility knife. I scored the cardboard on one side with the knife, then flipped it and cut it out from the other side. I wanted it to be a rosé wine-light pink in color. I looked for acrylic paint at WalMart and saw they wanted 4 times as much for a pink color as white paint. I diluted some of the left over red paint from the barn into a bottle of white paint to make this pretty pastel pink color.

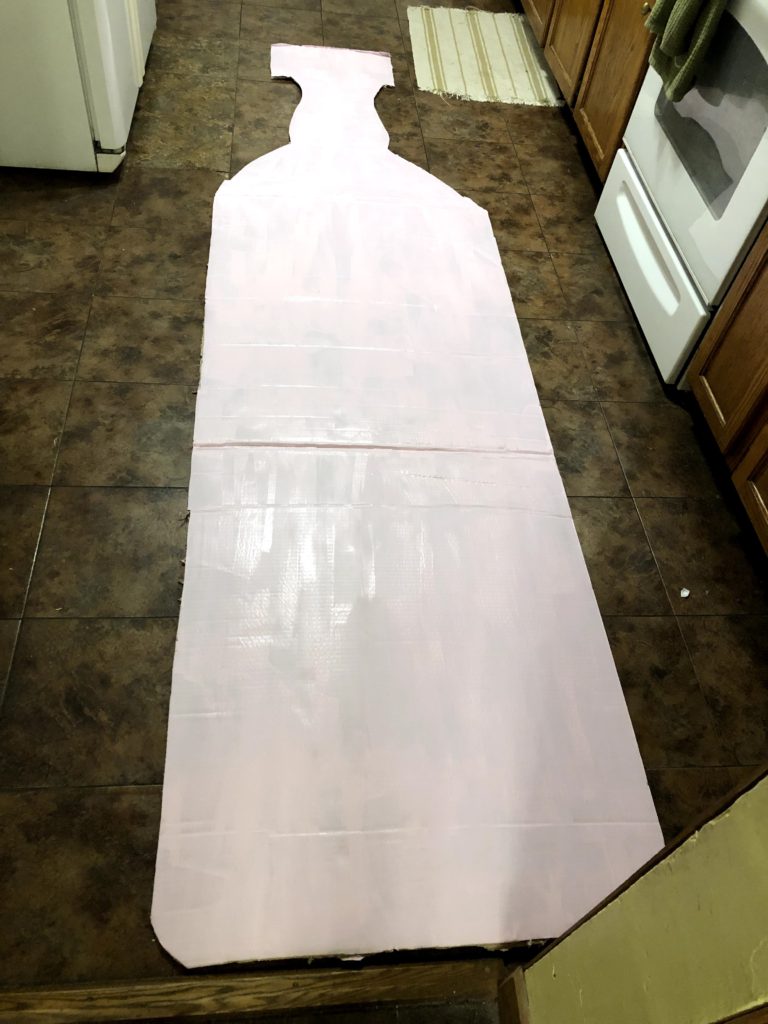
The bottle ended up being about 10 foot tall. I blew up about 30 pink balloons for her office space and barricaded the entrance with the bottle turned on its side. She was surprised to say the least!

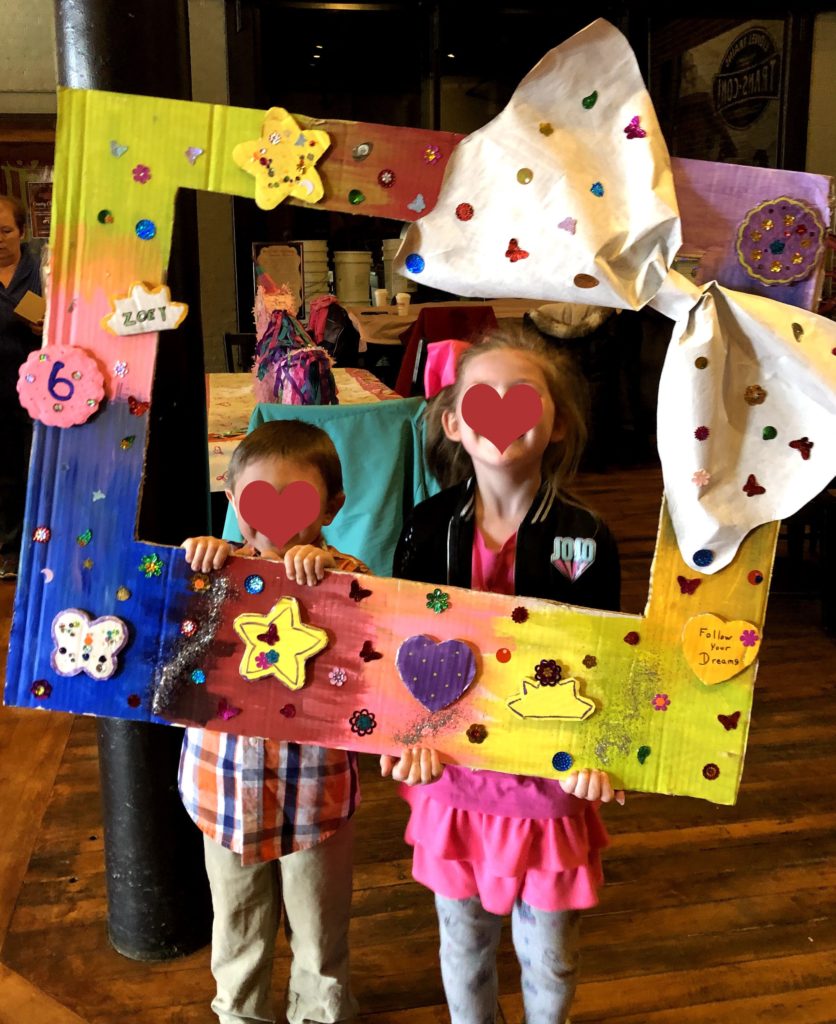
I still have a small supply of cardboard boxes (and I know where I can get more if needed). I’ve only had one other adventure with cardboard, a photo frame for a little girl’s 6th birthday party. The frame was easy enough to cut out of the leftover refrigerator box supply. The giant bow was made from the center of a wrapping paper roll, it’s a really lightweight cardboard that is easy to crinkle and shape. All of the add on shapes were traced from cookie cutters used to make the cookies at the party so they would match, and of course the birthday girl got to decorate everything herself. I’ve often used cookie cutters to get precise and consistent shapes (in the days before I had access to a Cricut). One of my favorite projects to use cookie cutters with is Christmas ornaments. I trace the shape onto felt and sew two pieces together, stuff it and hand out to family, friends and co-workers.

Selfie Photo Frame - Adventures with Cardboard

I am so excited to see what 2019 brings and what other adventures with cardboard will happen! Have you ever used cardboard as a medium? I’d love to hear what adventures other people are having with cardboard.

Honeybee Artwork: Art Made with Bees

This past year, I have seen so many fascinating articles about honeybee artwork, that is art made with the effort of bees, not just art featuring bees in the design. I’d like to compile these articles here, and if there are any I’ve left out please share them!

Aganetha Dyck – Sculptures with Beeswax

Aganetha Dyck has been giving bees sculptures to build their honeycomb on for years, but until recently, I didn’t have the pleasure of seeing her artwork. Some of this honeybee artwork is eerie, some of it old fashioned looking. It is so interesting to see where the bees build their comb up and other areas that are untouched.

Aganetha Dyck Beeswax Art

Hilary Berseth – Sculptures made of Honeycomb

Hilary Berseth sets up the framework for her sculptures, and then lets the honeybees do their work. Honeybees are very precise workers, but even so, you cannot expect a certain outcome given the framework provided. It is also really neat to see the depth of color in the honeycomb. As honeycomb gets older, it turns from paper white to dark brown. I really love this example of honeybee artwork.

Hilary Berseth Honeycomb Artwork

Penelope Stewart – Beeswax Installations

Penelope Stewart’s honeybee artwork invites you into a room completely made from beeswax. She sculpts the walls and decorates them with many intricate carvings. The carvings range from leaves and roses to less organic designs such as teacups and spoons.

Penelope Stewart Beeswax Art Exhibit

Ren Ri – Honeycomb Installations

Ren Ri came out with art installations in China this year. He creates the framework, similar to Hilary Berseth, but focuses more on geometric honeycomb designs. The honeycomb can be manipulated by the bees into so many different shapes and sizes, with very little support from dowel rods. Each honeybee artwork design is encased in a plastic shape.

Ren Ri Honeycomb Art Installation

Lea Ann Rochon – Painting with Beeswax

Lea Ann Rochon has been experimenting with colored beeswax as paint. Beeswax has been a type of paint for thousands of years and can stand the test of time. There are Egyptian paintings still today that used colored beeswax. I love the idea of artists using beeswax as a part of their honeybee artwork.

Lea Ann Rochon Colored Beeswax Paint Art

Various Artists – Y/Bees?

Santa Maria Public Library’s Shepard Hall hosted a found art exhibition all featuring honeybees. The goal was to spread awareness of the plight of honeybees and what people can do to help. There are many different honeybee artwork on display, and you can explore them all by visiting the website.

Y/BEES? Honeybee Artwork


AnneMarie van Splunter – Park Bench for People & Bees

AnneMarie van Splunter designed a park bench for people to sit on and for bees to rest in. The goal is to make people and honeybees more comfortable around each other. We share many common spaces together, such as parks, and need to understand that we both have a place there. This honeybee artwork is both functional and beautiful. Can you hear the bees buzzing around this open field as you soak up the sun?

AnneMarie van Splunter Honeybee Bench


There you have it! Honeybee artwork inspired and made by bees. These art displays are all across the globe, not just in the United States. It’s important for people worldwide to understand that honeybees impact us all as the most important pollinator (currently) for our food supply. Thank you so much to the artists who are helping to spread this message!

Top 10 Social Media Best Practices

No matter the social media platforms your brand is on, you can pull from these best practices to optimize your social media plan. These work for any social media strategy too: gaining followers, increasing conversions, boosting brand engagement, raising outreach and advocates.

1. 100% Complete Social Media Profile

For any given social media platform, you should make sure your profile is always 100% complete. Once you set up a profile, however, changes may be made that you’ll need to act on. For one of my clients, they had a complete profile until the website decided that reviews were a part of the profile. In order to have a 100% complete profile, each user needed at least 3 customer reviews. This meant we had to request reviews in order to complete the profile. In addition, you may have made changes to telephone numbers or locations, and should always make sure your social media profiles are completely up to date. When your profile is complete and up to date, other users will be more likely to interact with you and trust the information you are posting.

2. Always include a pic

As you scroll through Facebook or Twitter, do you ever notice that you will take the time to read a post if it includes a picture? Images grab a person’s attention, and for some social media websites like Pinterest, an image is always required to share a post. Don’t waste your time tweeting and posting text only. If you don’t include an image, it most likely won’t be read and will blend into the user’s newsfeed. Sendible Insights has an article on thePower of Images in Social Media with some great stats on including images in posts.

3. Put links, mentions and hashtags last

Posts can be comprised of a number of bits of information: a summary of what you want to say, a call to action, a link, a mention and hashtags are the most common. The order you put them in matters for social media users. This is the optimum way to organize a post and ensure it both grabs attention and causes people to take action. The reason I put links, mentions and hashtags last is simple: people who are mentioned or are searching for such hashtags will find your post. However, for those who see your post in their news feed, it needs to stand out with a short summary and call to action.

Formula for Attention Grabbing Post

4. Post at peak times

Media Bistro recently had an infographic all about when the best times to post on social media are. One thing to consider is the time zone you are in versus where your audience is. As a rule of thumb, post very early in the day and after lunch time. People tend to check their news feeds while getting ready in the morning and also after lunch. I like to test out when the most action is taken for each client of mine and post during those times though.

5. Stay consistently active

Don’t forget that you are a part of a social community. You shouldn’t be just posting content, it is important to interact with people too. For my clients, I try to keep track of keyword mentions in different social media networks. This lets me get involved in conversations and help answer questions in real time. When I have time, I just scroll through the feed and pick out the people I want to respond to.

6. Use automation to schedule posts

There are numerous online services that allow you to schedule posts on various social media websites. I do use this, but still search for news and articles about relevant topics every day for clients. There is nothing like sharing breaking news and getting a great response instead of just relying on scheduled content that may not be relevant by the time it is posted.

7. Don’t rely on automation for notifications

One of my co-workers was working with an automation service and she found out that it had stopped notifying her of mentions and messages across all her clients and all her social networks. This really made me feel that automation for these important interactions may not be best. If you do use automation, and have a quiet day, it may pay off to log in and double check that no one is trying to get ahold of you.

8. Gather benchmark data

Any time I start with a new brand, I always gather benchmark data. These include the number of posts, followers, reach, etc for each of the social media networks. I do this so I can see where the brand started at. Once you have your benchmarks set up, it is important to check your metrics and track them over time. There are services like SumAllthat will do this for you too. By comparing your data, you should be able to make sure you aren’t losing followers, are gaining popularity and making progress.

9. Use a URL Shortening Service

Tracking conversions is important for people working in social media. One way marketers can help to track click-thoughs is by using a URL shortening service like Hootsuite orGoogle. There are many different platforms out there that essentially do the same thing, but you’ll want to make sure there is any easy way for you to see if people are clicking on your content and what your most popular links shared are. This information can then be used to further optimize your social media efforts.

10. Thank people who follow you and re-post content

This point goes back to being a good member of a community. As a brand on a social media website, it is important to thank people who interact with you and show an interest in what you are doing. They are giving you free PR and the least you can do is say thanks.

There you have it! All top 10 social media best practices. What do you think? Are there other really important best practices missing from the top 10?

5 of the Most Unusual Benefits of Honeybees

Most people know that honeybees are responsible for pollinating flowers. A lot of people know that honeybees pollinate 1 in 3 bites of food we eat. Quite a few people love to eat honey and use it regularly. But aside from these important benefits of honeybees, there are many rather unusual benefits you may not have heard of. Some of them may sound like science fiction, but I can assure you that these are real. If we don’t wipe out honeybees, it will be great to learn what other benefits of honeybees given these excellent examples

5 of the Most Unusual Benefits of Honeybees

Honeybees Detect DiabetesDiagnose Diabetes

In August 2014, NPR in Boston reported that scientists were training bees to diagnose diabetes. Diabetics apparently have a higher amount of acetone in their breath than do people without the illness. Bees are 10,000 times more sensitive to smell than we are, and it is thought that trained bees would be able to detect this small amount of acetone. Bees in the study were able to correctly identify patients with diabetes 70% of the time. However, the patients in this study had well regulated diabetes, and for those who are undiagnosed, the acetone would be more pronounced and easily detectable. This is an important discovery, as the test would be low cost and easily accessible for people around the world. This is one great benefit of honeybees!

Honeybees Detect CancerDetect Cancer

Similar to diabetes detection, scientists are also training bees to detect cancer from breath. Patients breathe into a tube, and bees rush to smell the air and alert the tester. Bees reportedly can be trained within 10 minutes to detect cancer, diabetes and tuberculous, among other illnesses. When bees detect the scent researchers are targeting, they are rewarded with a sugar substance. Bees might be able to be trained to detect cancer early on when it is very treatable, making this benefit of honeybees a potential life saver.

Honeybees Detect Land MinesFind Land Mines

Bees have been used for years to collect environmental information, and this experiment expands on this knowledge. As bees interact within an environment, they inadvertently collect information on what types of substances they encountered along the way. The US Department of Defense has been working on this project by attaching RFID tags to bees. The bees fly out of the hive and interact with the environment. When they return to the hive, a chemical analysis is done to detect materials used in land mines. The RFID tracks the bees every movement, allowing researchers to pinpoint where the bees picked up the chemical trace and thus locating the land mine. This is another life saving benefit of honeybees that could be used in countries dealing with active land mines.

Honeybees Have Beneficial BacteriaNatural Antibiotics

In September 2014, The Times of India released a report saying that bacteria found in a honeybee’s gut may be the next generation of antibiotics. For centuries, people have known that honey had anti-microbial and anti-bacterial properties. In fact, honey can last for thousands of years without spoiling. For this experiment, the patients were actually horses with flesh wounds that had previously been treated unsuccessfully by other methods. A topical cream, made from bacteria found in honeybees and honey, was applied to wounds on several different horses in the experiment. All the horses healed well due to the topical solution.

Honeybee Propolis as MedicineBee Propolis Medicines

Bee propolis has been used for years in medicine. It is made by honeybees from tree resins and used to seal up the honeybee hive. It works so well, in fact, that hives have been found to be cleaner than operation rooms in hospitals. Propolis can be used for a number of reasons: similar to an antibiotic cream applied on top of wounds, treating canker sores and can even be used as a way to boost fertility. Beekeepers have taken note of this and started to sell propolis pills and creams along side honey and pollen jars.

Happy National Honeybee Day! 3 Simple Things YOU Can Do Today

National Honeybee Day Banner

National Honeybee Day is Saturday, August 16! Here are 3 simple things you can do to help honeybees.

3 Simple Ways to Celebrate National Honeybee Day

1) Don’t use pesticides or herbicides this weekend.

There are often organic ways to get rid of unwanted pests and plants. You might even find that you don’t need to use these chemicals after National Honeybee Day. Weed Killer RecipeOrganic Weed Killer Recipe: 1 TBSP Dish Soap 1 Gallon White Vinegar 1 Cup Salt Pour ingredients into your sprayer and spray weeds at base of plant on a dry day. Within hours, you’ll see the plants shrivel up and die. Check out Mother Earth News’ website for many organic pesticides. A lot of the ones we’ve used involved common spices like cinnamon and hot pepper flakes. These won’t hurt the honeybees and will deter bugs from entering your home.

A Lawn for Honeybees | National Honeybee Day2) Leave a patch of clover or dandelions in your yard when you mow.

These weeds are an important food source for pollinators, like the honeybee. In fact, you may have seen clover honey for sale in your grocery store, this is honey made primarily from these lovely clover plants that are cut down in your yard every week with the mower. Just move the mower deck to 4″ and you will go right over the flowers! This is a great habit to start for National Honeybee Day.

Buy Local Honey to Support Honeybees3) Buy honey from a local beekeeper instead of the supermarket.

Not only will it taste better, but you’ll be supporting local honeybees for National Honeybee Day. This isn’t a personal plug, as we don’t sell honey commercially. There are a lot of beekeepers throughout the US. If you are unsure where to find local honey, use the local honey locator on Honey.com or local honey on LocalHarvest.com. Even in the rural area we are in, grocery stores have a section for beekeepers to sell their honey. Just check the back of the honey container to find out where it was packaged and avoid honey that comes from outside the US. Some countries don’t have strict test standards for what constitutes honey, and real honey is diluted with corn syrup. It’s that easy! Please be mindful of the world we share with other creatures, especially the ones who we are dependent on for a variety of our favorite foods.

Build a Chicken Coop for Less than $250

The chicks that my cousin hatched out for us 3 weeks ago are getting much larger now. They really needed to get out of the brooder and into their own full size chicken coop. I really liked the first chicken coop that we have and wanted to build the second one the same way. It’s a solid design that has kept out predators for us plus it was cheap to make and quick too. It took 3 people about 12 hours to build the run for this coop, with multiple trips to the hardware store. The total cost for the house/coop and the run was $247.47.

Chicken Coop Full View

What you’ll need to buy:

Material Quantity Unit Price Total
Pre-Built Dog House 1 $109.99 $109.99
2″x2″x36″ Baluster (used for porch railing) 23 $0.89 $20.47
Hardware cloth (3′x10′; 36″ wide with 1/4 inch holes) 4 $17.97 $71.88
Door Hinges (3″) 2 $2.49 $4.98
Safety Latch (make sure it isn’t more than 3″ wide) 1 $2.98 $2.98
Door Handle (4″) 1 $2.60 $2.60
Rubber Coated Cup Hooks 1 $0.99 $0.99
9×3 Outdoor Wood Screws 1 $7.99 $7.99
Staples (T50 3/8″) 1 $3.46 $3.46
Sand paper (60/100/120 grit) 1 $2.29 $2.29
Play Sand 8 $2.48 $19.84
Grand Total $247.47

Tools you’ll need:

Drill

1/8″ Drill Bits

Phillips Screwdriver Bit

Hammer

Mallet

Wood Hand Saw

Metal Hand Saw

Staple Gun

Pliers

Straight Cut Aviation Metal/Tin Snips/Shears

Clamps

2″x4″ Wood

Tape Measure

Pencil

Chicken Coop Supplies:

Extension Cord

Heat Lamp

Feeder

Waterer

Landscape Brick

Chicken Coop Instructions

  1. Put together the pre-built dog house/chicken coop per the manufacturer’s instructions except you shouldn’t screw on the roof. We’ve left it unscrewed for easy access into the coop.
  2. Cut off both of the angled ends of 15 Balusters using the clamps to hold the wood in place on your work surface (I used a stool) and the wood hand saw. Get as close to the edge as possible so the are square, but it doesn’t need to be perfect. Use the sandpaper to finish the ends so you don’t get any splinters later on.
  3. Cut off one angled end of 8 Balusters. These will be used for the chicken coop sides. Use the sandpaper to finish the ends so you don’t get any splinters later on.
  4. Screw together your top and bottom. I used the 1/8″ drill bit to pre-drill the holes. The outdoor wood screws have a feature on the end that makes them easier to install, but I still find it easier to pre-drill the holes. If any screws pop through when doing the middle pieces, use the metal hand saw to cut off the screws.
    Side of Chicken Run Top Corner of Chicken Run
  5. Roll out the hardware cloth over the top piece. We used landscape bricks to hold down the hardware cloth before cutting it. Cut to size with tin snips. You should only have to cut one end as it is already the the same size as the 36″ Balusters. Try to cut as close to the joints as possible to avoid snagging your clothing later on. Secure the hardware cloth to the wood with staples every 3″. If you miss or the staple doesn’t go in all the way, use the pliers to pull it out or the hammer to push it in.
  6. Repeat step 4 for the bottom piece.
  7. Now you’re ready to secure the top to the bottom. Screw in the side pieces to the bottom. There is a Baluster at each corner, and two in the middle to stabilize the chicken coop.
  8. Screw in the side pieces from the top so it is screwed on bottom and top.
  9. Add your hardware cloth to both sides.
    Side Corner of Chicken Run
  10. For the ends, you’ll start with the part of the run that the chicken coop goes into. We used 2″x4″ pieces of wood around the front of the door to make sure the chickens had a secure entrance. The only hardware cloth we used on the opening was just at the top. There is a 5″ gap between the coop roof and the run. Screw in a 36″ baluster with both ends cut off, trim the hardware cloth and staple it. Use the mallet to get the Baluster into place if it is a snug fit.
    Chicken Coop and Run Connection
  11. For the door, screw together your door and add on your hardware cloth. Use a pencil to mark where the holes for your hinges will go and screw the door to the coop. On our new coop, I put the hinge flat onto the door and supporting side piece. For the first coop, I put it on a right angle. Screw on your handle and latch. We use a combination lock to lock the door of the coop since we live in the city.
    Chicken Coop Door
  12. Next to the door, you’ll want to add in your last Baluster piece so you can close the coop with hardware cloth.
  13. Screw in a cup hook on either side of the coop, just below the roof. You’ll use these to hang a heat lamp on one side and your feeder on the other.
    Inside the Chicken Coop
  14. Add in bedding. We use sand in the run and corn cob or pine shaving bedding for the coop.
  15. Add in your waterer, use a landscape brick to keep the chickens from getting a lot of bedding in it.
  16. Add in your chicks/chickens and get the camera out!

Chicks in Chicken Coop

Chicken Coop Blueprint

Optional Accessories:

Porch Swing Bird Feeder-I just fell in love with this feeder and since it is the end of the season, I happened to get one on closeout at Lowe’s. I’ve also seen this at Tractor Supply Company too.

Flowers/Herbs-I got a few pots of pollinator-friendly flowers to put around our honeybee hives and the coops. There are herbs that people plant near their chicken coops to reduce odor and bugs. I’d like to plant basil, lavender, mint and rosemary next year.

Exercise Pen with Bird Net-During the summer I wanted to let the chickens have a little extra room without sacrificing safety. A fellow BYC Indiana thread commenter, recommended this great exercise pen. I found it at Tractor Supply and just added chicken wire on the outside with zip ties to secure it. I put bird netting above it to keep out any flying predators. The chickens are closed up at night and only allowed outside in the extra space during the day.

Optional Exercise Pen

Chicken Roost-I bought a thick dowel rod and used closet hardware to add a roost on the inside of our first coop. The closet hardware lets you take the rod out to clean it easily. You can see a chicken on the roost in the photo above.

PVC Waterer-My cousin actually custom built a waterer out of PVC and nipples for our first coop. It holds 2 gallons of water and works really well.

Rocks/Driftwood-I added in some different sized rocks and a piece of driftwood to our first coop so the chickens could perch and give them something to do. When the coop is cleaned out, I re-arrange them to make it more interesting for them.

Beekeeping Associations by State

Did you know North Dakota is the #1 producer of honey in the United States? In 2012 they sold $64 million worth of honey. Did you know 16 states boast the honeybee as their state insect? What about this, did you know that every state has a local beekeeping association? If you are interested in becoming a beekeeper or you already are a beekeeper, joining a local association can be very helpful. Not only will you be in touch with other beekeepers, you often can get discounts on beekeeping-related items. In Indiana, our association runs a beekeeping school offered a few weekends throughout the year and also members host beekeepers to help around the apiary and learn about beekeeping.

Here’s a list below of all 50 states and their state bee associations/clubs:

Alabama, Alaska, Arizona, Arkansas, California, Colorado, Connecticut, Delaware, Florida, GeorgiaHawaii, Idaho, IllinoisIndiana, Iowa, Kansas, Kentucky, Louisiana, Maine, Maryland, Massachusetts, Michigan, Minnesota,Mississippi, Missouri, Montana, Nebraska, Nevada, New Hampshire, New Jersey, New Mexico, New York, North Carolina, North Dakota, Ohio, Oklahoma, Oregon, Pennsylvania, Rhode Island, South Carolina, South Dakota,Tennessee, Texas, Utah, Vermont, Virginia, Washington, West Virginia, Wisconsin, Wyoming

National Honeybee Day is August 16!

National Honeybee Day Pic

National honeybee day was started in 2009 by a group of beekeepers who wanted to promote beekeeping. The US Secretary of Agricultural made it a holiday and it has been celebrated around the country ever since. This year’s theme is sustainable gardening begins with honeybees, in an effort to get more gardeners interested in keeping honeybees. Gardening and beekeeping really go hand in hand and I have 5 tips (plus a bonus!) on why you should considering getting into beekeeping.

Top 5 Reasons Gardeners Should Become Beekeepers for National Honeybee Day

1. Beekeeping is a very fun hobby

If you enjoy digging in the garden and watching plants take root and grow into a plentiful harvest, beekeeping will similarly give you a lot of pleasure. It is so neat to bring home a 3 pound box of honeybees and have it grow to a hive with tens of thousands of bees. I love to watch the progress inside the honeybee hive too. During hive inspections, I get to see more frames filled with wax comb, then with brood, then with capped-over brood and finally with honey. We have so much fun making frames, boxes and inspecting hives that our friends, family and neighbors often get involved. We love seeing neighbors on their porches relaxing as they watch us manage our honeybee hives. It is really enjoyable for everyone around to watch.

Having Fun Beekeeping

2. Your garden will produce more thanks to nearby pollinators

We’ve had berry bushes in our yard for years, but until we had honeybees, we never had such large and prolific yields. This is a picture from 2012, the first year we kept bees, and we’d never had handfuls of these large berries before.

Blackberries July 2012

Our garden in 2012 did so well, this is a photo from July, and we had just planted everything in mid-May.

July 2012 Garden Photo

Did you know even cabbage is pollinated by honeybees? This cabbage was also harvested in July 2012, just 60 days after starting from seed.

Cabbage July 2012

3. You get the bonus of honey

Bees typically need about 60 pounds of honey, depending on your climate, to survive winter. Anything above this, you can harvest for yourself. We love having fresh honey to sell for extra cash. It is also great to have around for different recipes. Nothing is better than fresh berries with a little honey drizzled on top of yogurt! Many people don’t eat processed sugar or artificial sugar and many of our loyal customers use honey as their only sweetener.

Berry Dessert

4. You can also harvest beeswax

Beeswax is strained out of the honey and can be used for lip balm, candles, leather polish, book bindings and a whole lot more. Another product that bees make is called propolis, and this is a first rate medical product for cuts and scrapes. During the winter, it is fun to make different crafts out of beeswax and give them away as gifts throughout the year.

5. It’s relaxing to watch honeybees and manage hives

After being at work all day, don’t you just love coming home to your beautiful garden, your little slice of heaven? We love sitting in our backyard as the honeybees buzz around. Sometimes it feels like they have their own highways and byways they use to get from the hive to flowers and back again. It is also relaxing to watch bees and not have any technology or other distractions around at all.

BONUS REASON: 6. You are helping an endangered species

Did you know honeybees are endangered? Colony Collapse Disorder has many causes and is taking out bee hives on a major scale. These creatures have remained the same for millions of years and the main reason they are disappearing is because of humans. That’s why it is our responsibility to help bring them back, one backyard hive at a time.

Please join us and help celebrate National Honeybee Day on August 16th! If you are interested in becoming a beekeeper, search online for a local beekeeping club to help you get started. Many clubs and associations offer classes to get you certified and ready to manage hives in one weekend. These events start in late fall through winter, during the beekeeping off-season, which also coordinates with gardening off-season. Check out our full list of state beekeeping associations for details.

Honeybee Hive Inspection – Independence Day 2014

Happy Independence Day From College Beekeeper

This was a busy weekend for us! We inspected the hives and found 5 out of 7 hives needed a new deep box to give the honeybees more space. We were happy to have a 3 day weekend to build the additional boxes and frames. At one point, I ended up going to Sally Beauty Supply Store to buy 2 pounds of bobby pins, which we use to secure the wax foundations in the frames. I definitely got a strange look from the sales clerk when I said I needed about 1600 bobby pins.

In one of our hives, beekeeper Tim found the honeybees had built an extra frame on the side of a frame, but it was all drone comb. The reason it was probably all drone comb was that the honeycomb itself wasn’t built off of a wax foundation. The foundation is stamped with hexagons the perfect size for worker cells, and when left to their own devices to plan honeycomb, it is often uneven and so the honeybee queen lays drone eggs there.

Beekeeper Holding Frame Full of Drone Comb

Tim decided to give all the comb to the silkie chickens, and they really enjoyed pecking at all the larvae after they got over their initial skepticism.

Silkie Chickens a Drone Honeybee Comb

We ended up building 8 boxes and 40 frames, with 30 more frames needed to give each honeybee hive a new box. We are still feeding the honeybees sugar water but they have slowed down to 3 quarts or so a week.

I also had some time to take photographs for our ongoing honeybee photo of the day project. Please check us out on your favorite social media website so you can get our daily honeybee photos.

Photographing Chickens – 6 Quick Tips for Amazing Photos

Yesterday while on BackyardChickens.com, a member asked the silkie group how everyone took such amazing photos. She said that every time she tries to take photos, they don’t turn out very well. I don’t think that I take amazing photos I don’t know that I take amazing photos, but I’ve learned some things over the past year while trying to photograph my chickens.

6 tips for photographing chickens:

#1 Lighting

I have found pictures taken at dusk turn out the best for me. I think it is because there is no direct light but it is still bright outside. I assume the same would be true if you are an early bird and took pictures at dawn, but wouldn’t know personally. The way may yard is situated, with our side lot to the west of the house, I get filtered light in the evening just before sunset and pictures turn out much better than when I am taking them during the day. I also like photographing chickens around dusk as I don’t have to deal with shadows getting in the way.

#2 Treats

I try to get the birds to look up at me, instead of face down/tail up by bribing them with treats. For our Christmas card in 2013, I posed three chickens and used some club crackers leftover from Thanksgiving to get the birds to sit still and look up. You can see a cracker in front of the white chicken below. I will also try to get the chicken’s attention by holding a treat above their heads or snapping my fingers above their heads. Chickens love to eat bugs and I think the quick movement and sound of fingers snapping makes them think their might be a bug up there for them to eat.

Photographing Chickens for a Xmas Card

#3 Multiple Shots

I can take 10 pictures and I might get 1 that is usable. For the Christmas card photo shoot, I took close to 100 photographs and ended up using only 1, but I had several options to choose from. Once I make sure the camera lens is focused on the bird’s face, I will keep taking photographs without looking at them, hoping that one is good. Once the chicken moves, or I feel like I must have gotten a good shot, I will review the pictures to make sure I got at least 1 usable photograph. The pullet in front of the vase of flowers [first, bottom] had her picture taken at least 10 times before I got this one. She was hen raised and isn’t as comfortable in front of the camera as she is just sitting on my lap. The pair of Mille Fleurs [second, bottom] were happy to pose for me at my cousin’s farm, I ended up taking 30 photographs of them to get this shot with a peacock in the background.

Photographing Chick with Multiple Shots Photographing Chickens with Multiple Shots

#4 Videos

Sometimes I’ll end up taking a video and just take a screenshot to get a good picture. It is more difficult to get a clear picture this way, but in some situations it is impossible to take enough pictures to get one good one without making a video.

#5 Find your ham

I have a bird (my BYC avatar actually) that hears me pull out the camera and is there, waiting to pose for me. I have a very small flock (currently 9 silkies) and only 1 ham; chances are good you might have one chicken that would love to pose for you if given the chance and some treats.

I was trying to get pictures of honeybees in our yard one day, and when I pulled out the camera, Toppy, our ham for the camera, blocked the entire shot. I love his expression, as if he is thinking, “why aren’t you taking photographs of me and instead focusing on these little insects?”. I actually take a honeybee photograph for each day and post it across all our social media outlets for CollegeBeekeeper.com. So yes, chickens aren’t the only common subject for my photographs.

Photographing Chickens with a Willing Chicken

What’s even funnier is that I was looking at pics from last year when this guy was still a chick, and here he did the same thing! I was trying to get group shot of the birds in the back of their coop, and he steps right in front of the camera-blocking off the other chickens and in the worst light.

Photographing Chickens with a Willing Chick

#6 Get level

If I am photographing chickens, I am on the ground, usually laying and rolling around the grass as they move around me. If I put them on a surface, I sit up and make sure I am level. I have also found that I tend to get too close to subjects (like the silkie pullet in front of the vase above) and always need to take a step or 2 back. I used an iPhone 4s (5 megapixels) for the photographs from 2013 and use a Samsung Galaxy S5 (16 megapixels) in 2014.

That’s it for my tips on photographing chickens. Hope this helps other backyard chicken keepers take amazing photos of chickens!

« Older posts

© 2024 Amy Trueblood

Theme by Anders NorenUp ↑